Friday, December 30, 2011

Get Your Art On!

Hope my readers are having a relaxed Holiday! Enjoying lots of pictures and experiences (and scraps of cool present wrapping paper) to ad to our artwork...

I got "the Cloth Paper Scissors Book" last week...full of INSPIRATION. Editor Barbara Delaney was tasked with selecting an assortment of articles from past issues of the magazine, with some extra tips and resources thrown in for us loyal readers.

So far I have read Jodi Ohl's "beginner's guide to BEGINNING" chapter. An excellent place to start at the New Year with the inspiring words, "Make a commitment to do something, anything, every day to make your creative life a real part of your daily routine." A great reminder to me that no matter where else my life is pulling me - kids school and activities, work, divorce, parents, teaching, etc. - I'm choosing to carve out time each day to be creative for ME (what a concept).

My favorite part of Jodi's chapter is her "TIPS to get you started" column. This includes the idea to enlist some of my creative friends to have a regular art play date, begin an online blog (ala ArtBookBug), take pictures when I have a dry spell (got a new kickass camera for my birthday in Nov - thanks Tim!), and think about working in themes or collections to build a "body of work" (I'm finding this is soooo important), plus a lot more ideas, including "How to start?". Her wise words for us living the creative life, "I only manage doing it all by simply doing." My words...decide SOMETHING to do and (like putting one foot in front of the other) manage at least a small move forward every day!

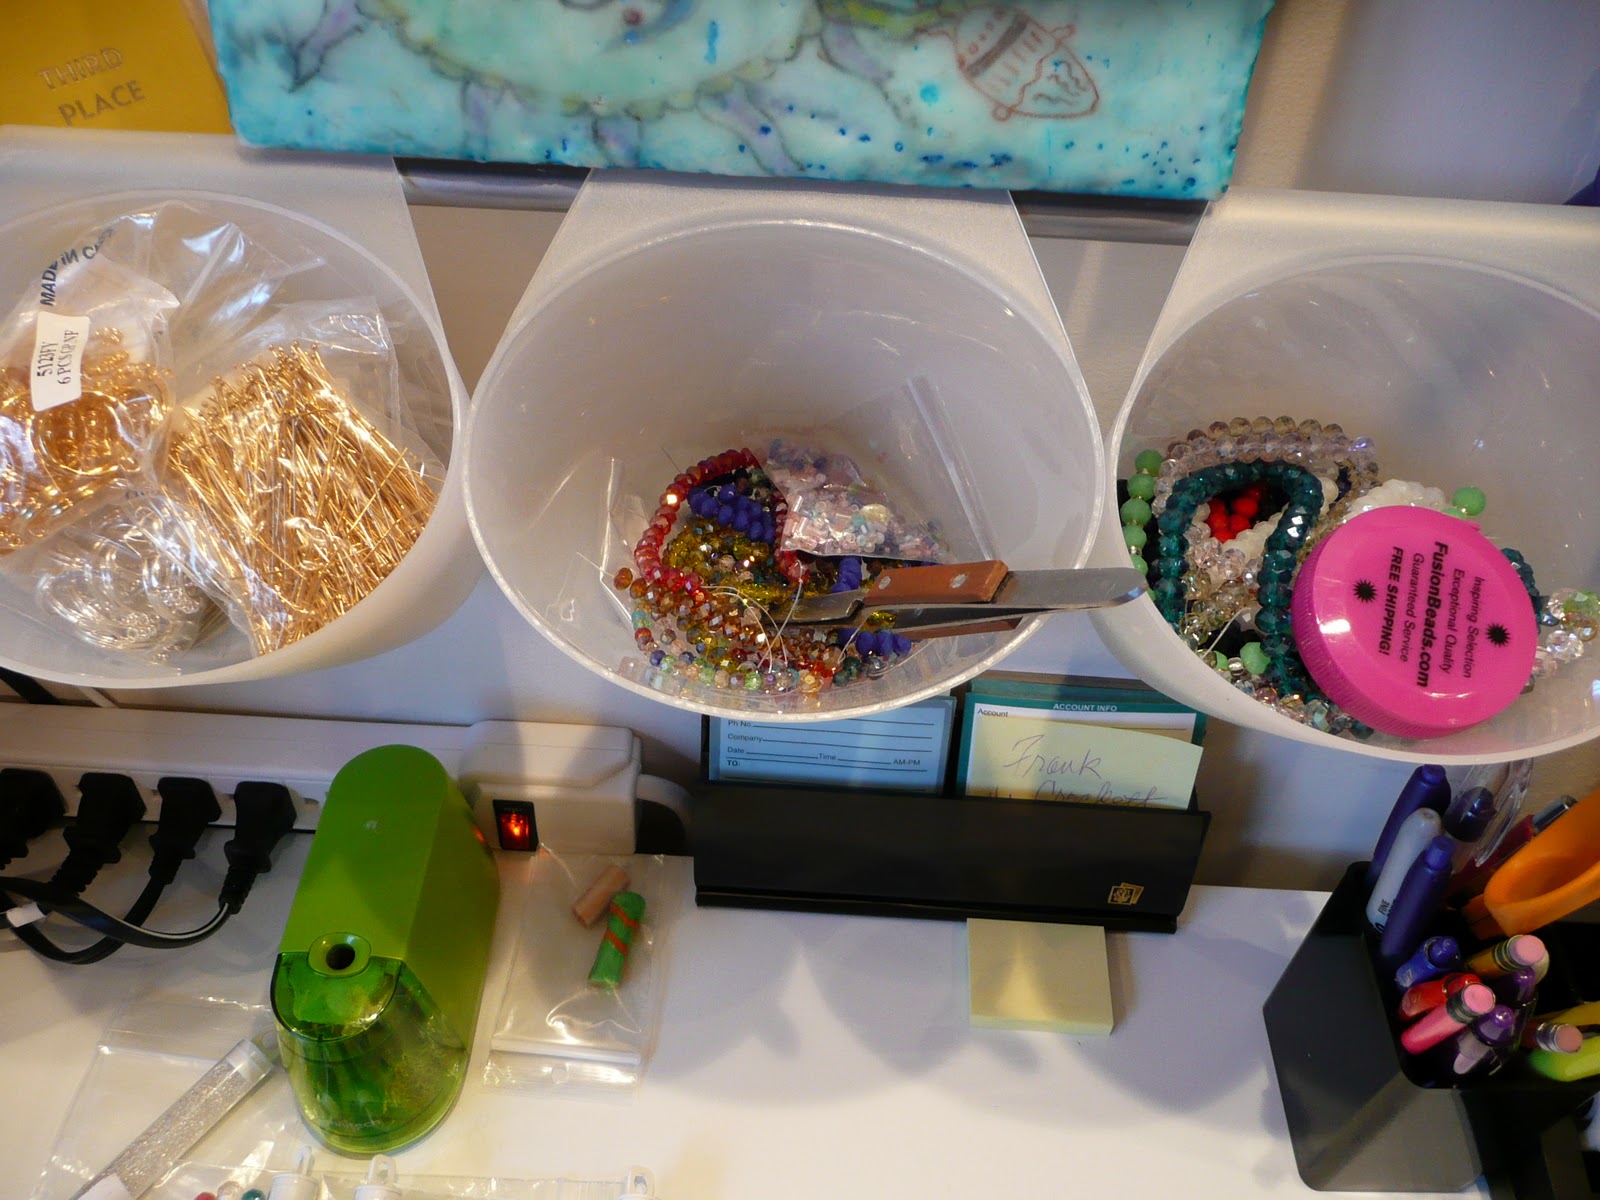
My creativity takes on many forms; sometimes just being able to take 15 minutes to read an artistic book or magazine to feed my brain, drawing zentangle(r) patterns or pictures that only require a pen and piece of paper, to full out days that I give myself about once a month to spend 4-8 hours straight pulling out all the stops in my studio with my papers/paints/mediums/inks/hard and soft canvases/encaustic wax/colored pencils and markers/and on and on! Please comment with your favorite creativity times/activities/supplies...

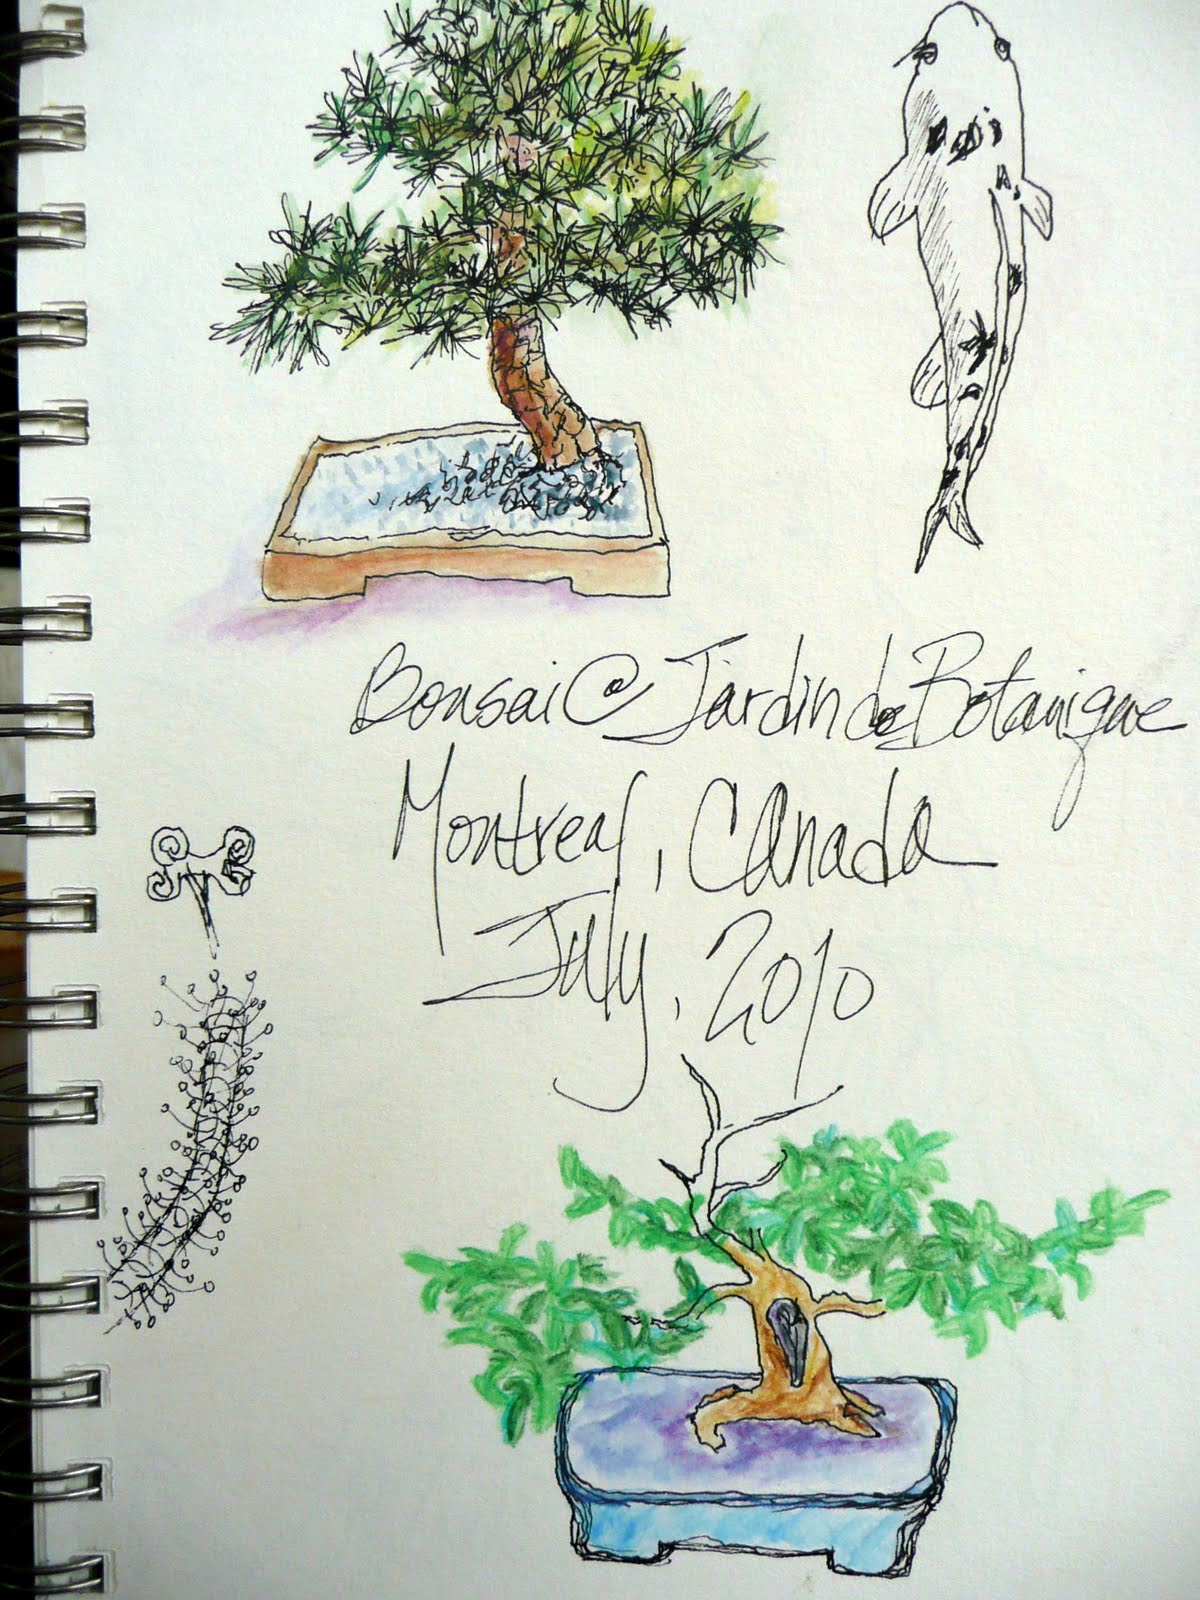
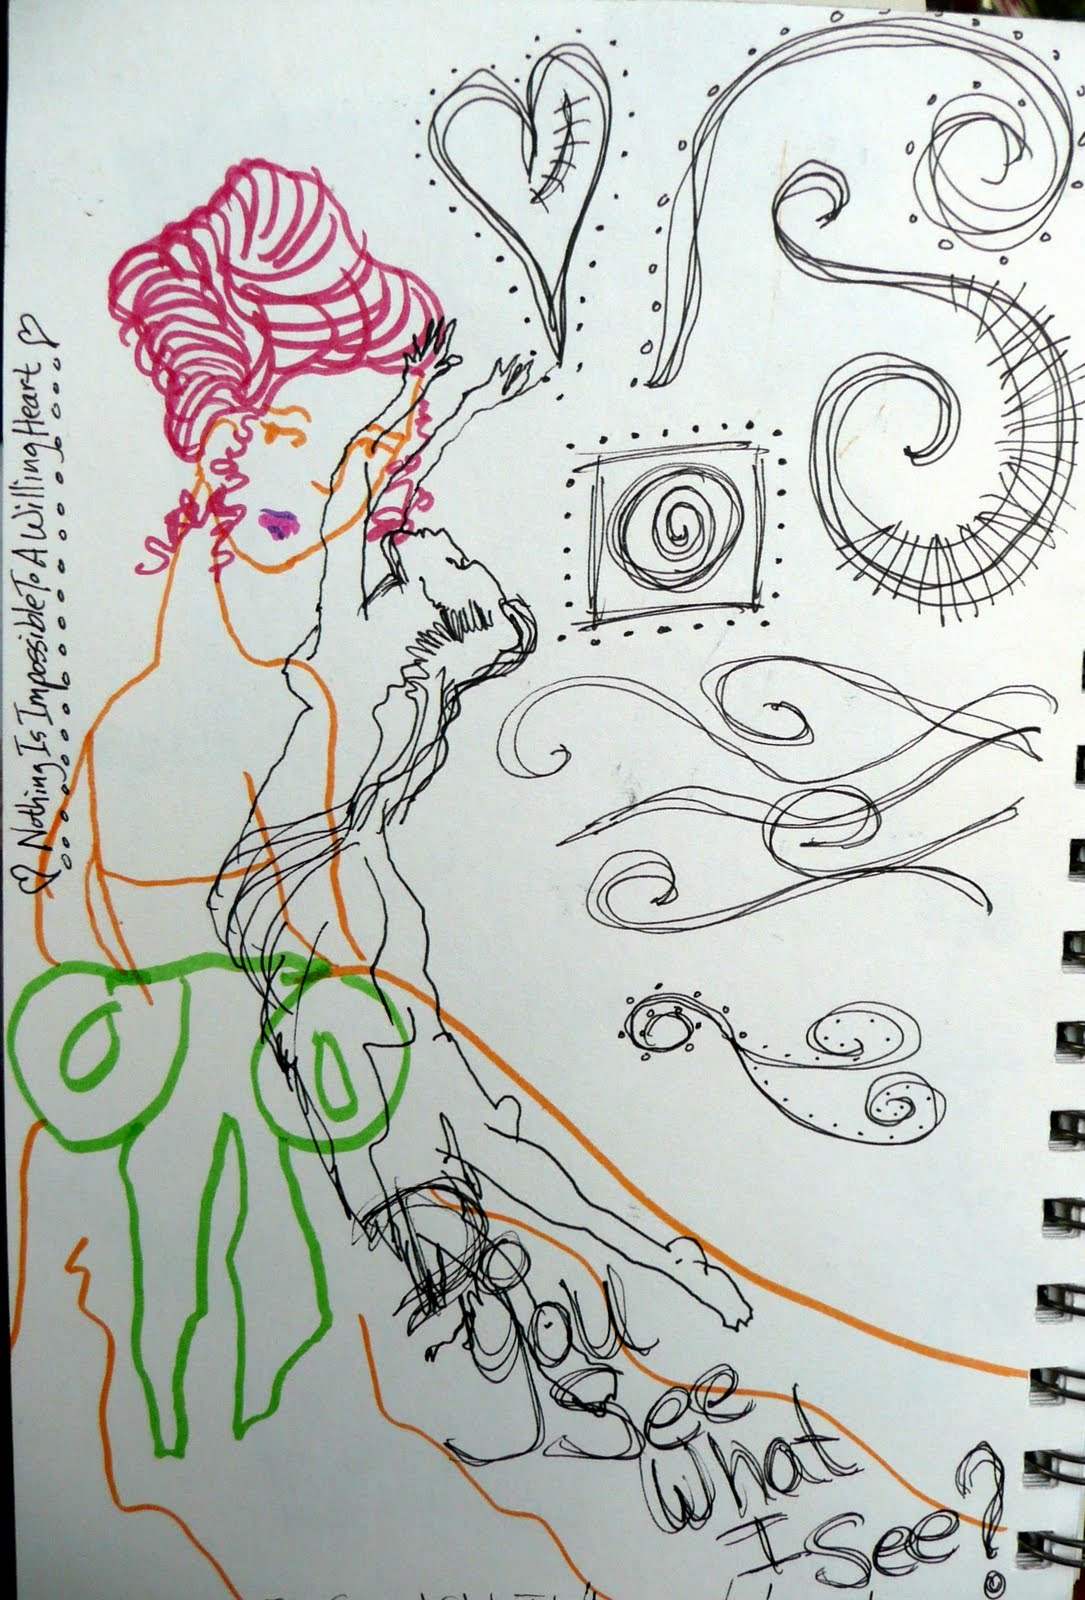
Here are my latest Zentangles(r):
 This is done on a watercolor postcard, so can be sent through the mail.
This is done on an Artist Trading Card (ATC).

By the way, thank you to all who gave me gift cards to my favorite Utrecht art supply store this Christmas! :)

Here's to making achievable artistic goals for 2012. ENJOY  THE  PROCESS and APPRECIATE THE AMAZING PEOPLE YOU WILL MEET ALONG THE WAY!!!

HAPPY READING AND CREATING ;)   Tristina

Monday, November 21, 2011

Fuzzy Headed

I was texting a friend of mine in the morning after dropping off the kids at school. She misunderstood something I had said and apologized for "being silly". I assured her that I share her same "early morning child induced intoxication" and am usually quite fuzzy headed myself until about 10am!

That being said, here is another of my recently finished Zentangles. I usually work on these in the morning when I just need to zone out till my body pumps enough blood to my head to be able to think cogently. :)


This Zentangle includes KurlyQ, Dropletts, Sprouts, Bricks, In N Out, River, ChainGang, Spinners, Portholes, Yimkin and a few others I don't remember the names of off the top of my head!

I will be hosting a Zentangle Artist Trading Card (ATC) demonstration at the Utrecht Art Supplies shop on North Federal Highway in Fort Lauderdale (next to the Whole Foods) on December 17 (Sat) from 1-3pm. Bring your blank ATC's (Smooth Bristol are best for this project) and Micron pens or purchase them at Utrecht just before the demonstration. Completed ATC's will be put on display in the shop for other customer's viewing pleasure. Should be a very fun and relaxing primer to the holidays!

To learn more about Zentangles, go to Zentangle.com or TanglePatterns.com. I will be going to class to get my "Certified Zentangle Trainer (CZT)" in Rhode Island in February... I'm a Florida girl, what am I thinking???

Cheers to your relaxing this Holiday Season. Happy Turkey - Thanksgiving - Day!  Tristina

Saturday, November 12, 2011

Latest Cloth Paper Scissors Magazine

It's always so nice to come home to the mixed media/collage magazine, Cloth Paper Scissors, in my mail box! After receiving the latest Nov/Dec issue, I devoured its pages like a hungry beast on the prowel for my next tasty morsel...

While reading through the magazine, I keep a sketch book handy to draw some of the images I see to lock them in my mind and play around with the ideas that inevitably arise from this exercise. Here is the sketching I did for this magazine:

Some of the pictures/words are drawn with my right hand (darker and more precise because I'm right handed) and some drawn with my left hand (lighter and more loose, child-like). I like to indicate somewhere on the page the magazine and issue that inspired the drawings. Also, in the top left hand corner you'll see where I started out, before drawing from the magazine, doing some loosening up exercises with blind contour drawing (looking at an object with your hand/pen on the paper, draw the object in one continuous movement - never lifting the pen from the paper - and not looking at the paper till done).

This issue of CPS contains an article on how to stretch a canvas yourself onto wooden stretcher bars. This is a great little article. Wish I had read it before attempting to stretch a finished mixed media piece of mine last year.

As I am very into working with encaustic wax, an article by Crystal Neubauer about using encuastic wax painting with plexiglass was particularly interesting to me. Crystal states, " Using plexiglass as a foundation for encaustic wax offers options that cannot be achieved with a traditional canvas." Encaustic wax can be applied to the front, back or both sides of the plexi, all giving different effects described in the article. One of the major advantages to working encaustic wax on plexi is the ability to achieve luminosity through the surface to/from the back of the painting that can not be achieved any other way. Fascinating! I have already applied a piece of hand-painted and waxed rice paper to the surface of plexiglass sheet, but had not thought to try working wax techniques directly ON the plexiglass. There are some spare strips of plexiglass sitting around in my studio that I couldn't bear to throw away...and now I know just how to use them!


Another excellent article by Wyanne Thompson that caught my attention is about pouring and painting resin in layers. Describes a way to paint acrylic directly onto cured resin and pour additional resin layers over top to get interesting floating effects. Super cool!

The paper mache'd, painted and embossed Bottle-Cap beads this issue shows you how to make with reclaimed metal beer bottle caps is da bomb! Also loved the story on quick and easy watercolor mountain range mixed media painting treats...looks like you can't make just one!!!

And last, but certainly not least, the Reader Challenge presented asks us to create a 4"x6" fabric postcard to mail in to their offices before January 20, 2012, some of which will be featured in upcoming issues of the CPS magazine and on their website. I'll be firing up my sewing machine and hot iron for this project soon. Check out clothpaperscissors.com for details if you would like to join in.

Happy Painting/Waxing/Sewing/Crafting! :D  Tristina

Thursday, October 27, 2011

Zentangle Works

     Preparing for my Divorce sure takes up a LOT of time! Been focused on pulling paperwork...so haven't had a chance to write, although I have been art-making and book-reading. :)

      Finished up a few Zentangles using designs from the Zentangle 2 and Zentangle 3 books (by Suzanne McNeill, CZT). These are on a Strathmore Mixed Media Visual Journal 3.5in x 5in. This is a great little journal to easily carry with me when I'm packing light. It has nice large spirals so that a Sharpie fine or Micron black pen easily fits inside to keep it close at hand and the paper is absorbent enough so that the ink doesn't smudge.

This sun image is my variation of a stamped and zentangled image in Zentangle 3 (I drew this face).

     Also in Zentangle 3 is a suggestion to make index tabs with the different zentangle designs as a reference, even suggesting just reaching into a jar of these index tabs and drawing whatever designs you pull out! Sounds like fun... Below are a few tags I cut out of Bristol paper (great paper for marker work) using a large punch bought at Michaels.


      When I travel heavy (which is most of the time!) I carry a baggie with me filled with black Micron pens of different nib sizes, a set of colored Micron pens (my favorite is Sanguine brown), Utrecht double ended colored markers, a soft 6B pencil for shading, paper smudging stump (tortillion), pencil sharpener, eraser, and white pen.

     My regular sketch book is a Canson Field Drawing book 7in x 10in, also with big spirals. See below how this book holds 4 micron pens! I usually have the 03, 05 and graphic 1 or brush (for filling in) black nib sizes and have also been carrying the Sanguine color pen. See the work in process using both colors, I love it!


     Zentangle is having their next teacher certification class in Rhode Island in Feb. I know it's crazy to imagine a Florida girl in the NorthEast in the dead of winter, but I'm so excited to go up and get certified to teach Zentangles! Then I'll offer classes in Miami/Dade, Broward and the Palm Beaches. So much to learn and share. :)

     Happy reading and experimenting!  Tristina

Friday, October 7, 2011

The War of Art

     Just received in the mailbox today from Amazon (every Amazon box makes me feel like it's Christmas!) a paperback book called, The War of Art, by Steven Pressfield that I discovered while surfing for business and personal growth books a week or so ago.The sub-title is, Break Through the Blocks and Win Your Inner Creative Battles.

     The write-up on this book intrigued me because it addresses procrastination in the creative process head on...and I'm a procrastinator extrodinare!

The back cover states:

     "THE  WAR  OF  ART is an inspirational, funny, well-aimed kick in the pants guaranteed to galvanize every would-be artist, visionary, or entrepreneur. Bestselling author Steven Pressfield shows readers how to identify, defeat, and unlock the inner barriers to creativity."

     Looking for the proverbial AhHa moment or moments in reading this book that will propel me to the creative greatness I know that lurks inside me!

     P.S. Got off my duff on Wednesday and submitted 5 encaustic pieces of artwork and an artist statement to the Encaustic Works 2011 call for entries that ended...you guessed it, that night! Wish me luck!!!

     Happy reading and creating!  Tristina :)

Saturday, October 1, 2011

Bling Ring Frenzy

Yesterday I cleared off the paperwork from my studio desk and rewarded myself last night with making a few bling rings!


3 Rings done and one on the bead mat laid out. I use chain-nose, round-nose and cutter pairs of pliers to make the rings. I buy the ring blanks and ball end headpins from Fire Mountain Gems (each ring blank has 2 rows with 5 loops each). I buy the glittery Chinese crystals (8mm rondelle) from Annie's Beads online as well as at Beads on the Avenue store in Delray Beach. The top ring on the right also uses 8mm bicone beads together with the 8mm rondelles. I am so intensely focused when making these rings, that after making each one I have to get up and stretch everything in my body!!!


Here are bags of crystal combinations laid out with their corresponding ring colors (silver, gold, antique silver or gold) with accent beads that are put on the ball end headpin first to keep the headpin from slipping right through the large hole of the crystals. This is how I plan ahead to make it easy to whip up a ring or two when I have a little spare time and feel like making something.


Here is my desk layout with a bar, hanging cups and hanging hooks from IKEA. The artwork is mine! I keep the flip up OttLite plugged in and ready to go at all times.


 Each hanging cup has ring making supplies: left has ring blanks and ball tipped headpins, center has 6mm filler crystals (to add variety to the rings) and a pair of tweezers, and the right has 8mm crystal strands and a measuring tape.


 Here you can see how I am able to hang crystal strands that have loops on the end on the hooks and, my favorite part, tools are easily perched along the bar to keep them readily available!

Happy CREATING! :)     Tristina

Monday, September 26, 2011

Art Show at Storks

So excited to have my latest Paperscapes (tm) paintings on display (and for sale ;)) at Storks Coffee House in Davie, FL!


Thanks Ken and the Broward Art Guild for providing the venue and helping with the set-up.

Tristina :)

Tuesday, September 13, 2011

Zany for Zentangles!

I'm hooked! After having read an article in Cloth Paper Scissors magazine last year about the meditative qualtiy of working small tiles of white paper with black ink in repetitive patterns - called Zentangles - I tried the technique and fell in lust...

To take my art to the next level, I bought from Amazon.com a Zentangle's Basics book by Suzanne McNeill and have played around with the patterns for the past several months; stealing a few minutes here and there to add to my picture blocks as I could. Here are some of examples of what I created:


Later, when I was well addicted to making Zentangles, I went again to Amazon to peruse other Zentangle books that might be available. To my delight, there were many, many more books and even including colored Zentangles! I immediately bought 8 more Zentangle books, some of which have not even been published yet, so I can get them as soon as they come out. Just looking at the book covers inspired me to make the tangles below:


Now I have begun to work bigger and cram more designs onto a larger page of my sketchbook. Here is one of my Zentangles in process:


Next stop...going to get my Certified Zentangle Teacher (CZT) training asap so I can share my entheusiasm for this relaxing and VERY satisfying artform (that anyone can do, "one stroke at a time") by presenting classes in the Miami / Fort Lauderdale / Boca Raton area. :-D

To find out more, go to Zentangle.com. FASCINATING!!!

Happy Reading and Drawing,  Tristina

Monday, August 22, 2011

I DIGRESS

OK, so sometimes I digress to read a book or magazine that's all fluff and not related to art...

When last at Barnes & Noble a book jumped out at me that looked like a quick read with a little comic relief titled "Exes & Ohs: A downtown girl's tales of love, lust, revenge, and a little facebook stalking" by Shallon Lester. I thought it might give me some insight into secret ways to cope with my impending divorce, like best ice cream flavor to nurse a healing heart!?!?

Soooo, this book reads like a 24 year old gal wrote it as though she was talking to her friends, swear words and all. Ran through it like a bag of my favorite Lay's fried potato chips...except I was surprised that, having written for a New York daily newspaper gossip column for years, Shallon used a ton of excellent words! Some I knew and some I didn't.

Here's a list of the words I picked out of the text that I'm excited to share with you; some you will know and others, well, I hope you'll learn something:

heinous, ardent, indigent, pilfired, gaffes, clandestinely, staunch, maniacally, betwixt, kerfuffle, ubiquitous, devolved*, derision*, nefarious*, unroofied*, pyrrhic*, haughtiness, circumvallation*, maladies, solipsistic*, ensconced, addled*, non-sequitur* and rotund.

The words with an asterisk were new to me! Dictionary, here I come.

And, guess what? Mixed in with her stories of romantic conquest and failure Shallon did include a chapter on ICE CREAM! But, here's her twist (I love it),
     
     "Since the dawn of of heartbreak, women have been using ice cream to mend their wounds and drown their sorrows, a sort of triage paste to patch up holes in the heart.
      Isn't it time that ice cream makers realize this and start gearing flavors toward their true constituents? Why, in the throes of being dumped, would I want to reach for something called Chubby Hubby? That just seems cruel. How about getting a little bit more specialized? Perhaps...

      'Googling Robert Pattinson'
       Tastes Like: Salty tears, black nail polish, and Hot Topic snap-on fangs

      'Told My Friends I Didn't Call Him but I Lied'
       Tastes Like: Wine in a box and an overly rehearsed voice mail message that conveys 'breezy!'
        not 'stuffed to the gills with Lexapro!'

      'In Bed at Ten P.M. on a Friday'
       Tastes Like: Three-day-old Chinese food and a putrifying mud mask"

etc.

I'm glad that I read "Exes & Ohs", just to disconnect and get caught up in someone elses whirlwind life for a while. Reminded me of my wild and wooly 20's! ;)

Happy Reading!  Tristina

Wednesday, August 17, 2011

The Decorated Page Book Review

Was so thrilled to finish reading a journaling book I have been savoring a few pages at a time over the past few months. Going to intersperse my review below with pages from my journals. Hope you'll share some of your journal pages and favorite journal making supplies with me in the comments...


The Decorated Page: Journals, Scrapbooks and Albums Made Simply Beautiful, by Gwen Diehn, got me with the cover! From postal stamps (I have a collection of about 1000 from around the world for my artwork) to watercolor illustrated pages to the ubiquitous Micron pen, the cover promised to help me turn my excessive supply of blank journals into expressive albums using Gwen's simple techniques.

The beginning of the book has an excellent description of different journal book types (with advantages and considerations of each kind) and a thorough discussion of mark making tools and paints; Gwen's favorite journaling paint is watercolor and mark making tool is the micron pen! My favorite tools are spiral bound Aquabee Super Deluxe 93lb paper drawing books (will take dry and wet media well), woodless dark/soft graphite pencil, Pitt black markers, Derwent ColorSoft pencils or Koh-I-Noor woodless colored pencils, and Penguin pan watercolors. Sometimes when I am travelling and don't want to take both the colored pencils and pan watercolors, I substitute water soluable Derwent colored pencils.


I love Gwen's 9 ways to prepare journal pages so that I'm not looking at a blank page to start. (A favorite of mine is to create a watercolor wash over a crayoned image to get a very interesting effect.) She later gives great examples of different page layouts (including text) such as bleeds, grids, borders, organic... Very well described and demonstrated with sample pages from many other artists. I especially like the idea of cutting and using my own stamps from wine corks (which I have a lot of after drinking copious bottles of wine!) which is beautifully described and demonstrated in the text.


One of my favorite parts of the book is a section called "Writing Small" by guest contributor Ann Turkle. It discusses ways to develop free flowing writing skills. She suggests springboarding by making mundane lists, describing everyday items in detail, observing, listening, and more. I learned A LOT here...

With so many pictures of journal pages from different artists, it was easy for me to get inspired to write, no matter what I think my handwriting looks like! As a bonus, I later found in Gwen's book a handwritten font I've fallen in love with!


Recently an arts magazine asked its readers if they were marooned on a desert island with only one art supply, what would it be? Mine would certainly be a big fat soft dark graphite pencil so I could journal on everything!!!

Happy Journaling!  Trisitna :)

Saturday, July 9, 2011

Polymer Clay Class Today!

Today I am giving a free demonstration of working with polymer clay in the afternoon at Utrecht Art Supply in Fort Lauderdale, FL! Have clay, tools, oven, lotions & potions all over my kitchen table in preperation. Will let you know how class turns out... :) Tristina

Wednesday, July 6, 2011

Color Inspiration Collage

Wow! I was exhausted the morning after hosting a fun 4th of July bar-b-que at my house. So, while eating breakfast I began perusing the book 'Polymer Clay Color Inspirations' by Lindly Haunani and Maggie Maggio as a way to wind down from the clean up that carried over from the previous day and reward myself for a job well done!

The pictures in this book are at once absolutely captivating and overwhelming! The thought crossed my mind, "How in the heck can I ever reproduce the fabulous projects in this book?" So, how do you eat an elephant? Of course, one bite at a time! I dived in determined to stretch myself to BEGIN the process of exploring color.

I was intrigued by the author's exercise 'Making Your Color Inspiration Collage'. The project called for working with magazine clippings to create a color collage that spoke to me and included the colors blue, red and yellow (primary mixing colors). I don't know about you, but I have piles of magazines and already torn pages containing colors, textures, words and interesting subjects as inspirational touchstones for creativity in my stash. About the color collage the authors say, "Having a starting point...helps you make the decisions necessary for developing your personal palette via an informed selectoin of your mixing colors." This seemed like the perfect place for me to start IMMEDIATELY!

Here is the collage I made on 14"x17" bristol paper using magazine clippings and a Uhu glue stick. (This project is really easy & fun!)


Now that I have made my first collage, I am addicted!

Reading on in the chapter, Lindly and Maggie suggest creating a reference library of inspirational color combination collages that please me. They say that as I create new collages I can increase my ability to discern subtle differences between colors. Execellent sample collage groupings appear in the book.

I can already tell making more collages will help me get more in touch with my favorite color pallets so I can bring these to my color mixing and painting... I've already begun a new bag of clippings with an exciting color grouping to start making another collage tomorrow!!!

Hope you will join me in this exercise. Post your picture in the comments area when you make a collage!

Tristina :)

Tuesday, June 28, 2011

Review Encaustic + Paper DVD by Wax Works West

This past week has been intense (my 2 daughters had a charity fashion show this past weekend, the last class of the Artist as an Entrepreneur series was this weekend AND I had 3 paintings finished just in time to submit to the Broward Art Guild juried Summer Show this past weekend)!!! Needless to say, I have been itching to sit down at my computer and write this review of the exciting Encaustic + Paper DVD by Wax Works West that I finished early last week...

Actually, this DVD inspired me to take one of my PaperScapes(tm), where the paper had been deformed during the wet painting process and that had been rained on by a sudden storm while drying outside, and cover the entire dry piece in encaustic wax medium as they demonstrated on the DVD. LOVE the results! I created a unique way to mount the waxed paper painting directly to a clear acrylic sheet and submitted the piece to the juried Summer Show. I'll let you know if it was accepted for the show later in the week... Either way, I will take pictures and explain how I mounted the finished waxed paper when I next see the painting. Here are pictures of the freshly waxed PaperScape coming off the pallet, then I fused the wax into the fibers of the paper with a heat gun:
 Saturating the PaperScape with encaustic wax medium on both the front and back.

 Fully waxed piece is very sturdy. I love the luminescence of the waxed paper!

Fusing the wax to the paper with a heat gun. Was beautifully translucent when done.

OK, on with the DVD review! I purchased the Encaustic + Paper DVD at R&F Paints when I was at a class in their facility in April. The teachers on the instructional video are Wendy Aikin, Judy Stabile and Daniella Woolf of Wax Works West out in Corralitos, California. The DVD was jam packed with loads of creative ways to use encaustic wax on paper with project examples good for the beginner to intermediate wax artist.

One of the first things I learned on the DVD was that Viva brand paper towels are the best for working with wax paintings because they are the most cloth-like and really impart a nice shine when rubbed over a fused wax surface. The Viva paper towels do not throw off little fibers like other paper towels. Another very important studio practice suggested by the gals was to wear Nitrile gloves when working with the wax and any loose pigments. I have been using Nitrile gloves anyway when I work with acrylic and oil paints, so it was easy to immediately add them to my encaustic wax work safety routine.

An important point I found raised on the DVD is that water and wax don't mix, so remember to be sure all paper elements are dry before beginning to saturate with wax. There were many fabulous quick in-studio demonstrations by the instructors, the most intriguiging of which for me were: making impressions using colorful heat sensitive foil on already waxed papers; copy transfers with parchment paper onto waxed papers; batik style wax resist with watercolor on paper; and making scratch patterns in waxed paper, then highlighting the patterns with alcohol ink.

The techniques presented are given in nice short vignettes so that it is easy to stop and start the instruction and still feel like you learned something even though you may have only had 5 minutes to fit in a quick watch. This is one of my favorite features of the film. Another favorite is that there is a segment on studio safety and what to do if something catches fire (complete with hunky firemen!). Something else I found extremely useful was that at the end of the DVD Daniella Woolf shows some of the tricks and methods she uses to compartmentalize her work for ease of  shipping and interesting ways in which she and her fellow teachers frame or present their work.

I am thrilled to have just submitedt my first encaustic and paper painting to the Broward Art Guild juried Summer Show...as a direct result of having been taught and inspired by the ladies in Encaustic + Paper! If you would like to learn more about Wax Works West, simply look them up at WaxWorksWest.com.

Happy Painting! :)

Tristina

Wednesday, June 15, 2011

Living at the Speed of Light?

I can't believe 10 days have gone by since my last post!!! Well, I have in that time bought 2 new art books (Steampunkery by Cristi Friesen and Creative Illustration Workshop for Mixed-Media Artists by Katherine Dunn) and 2 new magazines (Crafts 'n Things and Bead Unique).

The Crafts 'n Things magazine has "Kids' crafts for summer camps" as an attention grabbing headline for me and Bead Unique has a spectacular polymer clay necklace on the front cover including a fabric necklace for which I want to find out the supplier (Silk Necklace from Class Act Designs). Also, the Bead Unique magazine has 2 polymer clay project articles, so I am going to take the magazine to Monday night's SouthEast Florida Polymer Clay Guild meeting in Delray to show my fellow members what's new in the press related to Polymer Clay!

Reviews of the books will be forthcoming. Also, I am almost done watching an encaustic wax instructional video I bought on my trip to NY to visit R&F Paints, Encaustic & Paper by Wendy Aikin, Judy Stabile and Daniella Wolf. Fascinating! I have learned so many exciting new ways to wax that I will share with you soon when I finish the video...

Here are a few pictures of my latest works in progress:

 Gluing my hand colored papers to canvas.
 Completed Paperscapes, waiting for edges to be painted...
 ELEMENTS II (each component 8in x 8in)
 Untitled (each component 5in x 5in)
OCEAN  BLUE (8in x 8in)

Saturday, June 4, 2011

Artist as an Entrepreneur Institute and ArtWalk

June 4th...Busy day! All day at a program sponsored by the National Endowment For The Arts called Artist as an Entrepreneur to help me accelerate my understanding of the business of Art. It is a 4 weekend program only offered once a year in my area; tomorrow's the first day.  I love making art...and I want to learn the best way to get it into the most people's hands so more folks can ENJOY what I make!!!

After class, the Broward Art Guild (http://www.browardartguild.org/) is holding their first opening reception in their new gallery space at 3280 NE 32nd Street in Fort Lauderdale from 6:30-9pm. I have an underwater scene made with encaustic wax encasing 8 jellyfish that I drew in the show. The opening corresponds with the North Beach ArtWalk where other shops and restaurants in the area will also be open. I'm grabbing a couple of friends to join me for some fun out there...

Tristina :)

Thursday, June 2, 2011

Mulberry Paper Experiment

Today was another picture-perfect Florida day! Just the right amount of sun and breeze (not too much) to make more colored paper outside. I decided to experiment with a rough surface Mulberry paper; I love the texture of the surface and the tattered edges of this hand-made paper. It took the watered down acrylic colors beautifully! Here are pictures...


Happy Painting :)

Tristina

Tuesday, May 31, 2011

Review Patricia Baldwin Seggebruch DVD

Last night I watched Patricia Baldwin Seggebruch's DVD 'Encaustic Collage Workshop'. I love it when I am able to pick up new techniques from a DVD in the comfort of my studio!

Besides having an excellent introduction in the beginning third of the workshop re tools and using/creating beautiful encaustic paint colors from oil paint and R&F Paint Sticks, the video showed me how to finish off the sides of my encaustic painting panels and how to glue 2 panels together with gorilla glue to get a stacked effect. Patricia also gives a demonstration of how to install eye hooks and wire to make your encaustic painted panels gallery ready!

My favorite demonstrations on the DVD were when Patricia shows how to do paper transfers and rub-ons to add surface interest, how to use an oil stick to highlight texture incised into the wax surface and how to stain the wax with the same proceedure, then in the extras at the end of the workshop she shows her signiture shellac burn with beautiful powder pigmented shellac.

All of her demonstrations were very informative for me and inspirational. I'm looking forward to trying her paper collaging techniques out later this week...

Tristina :)

Monday, May 30, 2011

Submitted to BAG Landscapes Show

On Friday I submitted 4 encaustic wax pieces to the Broward Art Guild's Landscapes show. This is a juried show, so I'm not sure how many will make it in!?!?

One of the pieces I created at the workshop while in NY at R&F Paints...it reminded me of tree bark, so I created 2 other tree bark paintings to go along with it for the show. The 4th is an underwater scene with 20 different layers of wax featuring jellyfish that I drew, colored and transfered onto the wax at different depths.

Below are some pictures of the process; I'll show you the finished piece(s) that get into the show after the opening reception June 4th being held at the new home of the Broward Art Guild at 3280 NE 32nd Street. Very Exciting!!!

This is a detail of the wax painting I did at R&F Paints titled 'Chestnut'.

 Detail of recent wax painting titled 'Birch'. Lots of surface texture here.

 My photo and pictures from the internet of Jellyfish, my drawings colored with Pan Pastels and Colorsoft pencils, and a sample painting I did trying out different media to see what I wanted to put in my final painting.

The underwater painting titled 'Teeming' in process... There are already 5 jellyfish transferred into this picture on different layers of wax! Because the wax was warm when the picture was taken the surface is cloudy. After the painting cures (several days to weeks depending on how many layers of wax there are) the wax layers will become translucent and give the water depth illusion I'm going for.

Hope some of you can make it to the show opening next Saturday from 6-9pm. I will be going straight from the Artist as an Entreprenuer class at ArtServe being given by the Broward County Cultural Division . They will be teaching: Career Planning for Artists, Developing a Brand, Pricing, Understanding Customers, Building a Product Mix, Identifying Useful Resources, Writing a Business Plan, Working with Lenders, A session with Successful Artrepreneurs, etc. It"s not too late to sign up for this class if you are interested...simply register online at www.broward.org/arts and select workshops. The fee is a very reasonable $100 total for 4 Saturday classes (all in June).

I watched a new Encaustic Workshop video today and will give you a review of it tomorrow.

Tristina :)

Wednesday, May 25, 2011

Feels So Good!

Very exciting to hang my first solo Art Show at Java Boys coffee shop in Wilton Manors today with the Broward Art Guild's Executive Director Gerard Delaney. Stop by anytime to view the artwork on display from now through mid July at 2230 Wilton Drive. Will post when I schedule a Coffee Talk reception!

The Java Boys painting is theirs, other 2 are mine!


Hanging at Java Boys

Very Exciting! I am hanging a show of my PaperScapes (colored paper artwork) and Fossil paintings at Java Boys Coffee House in Wilton Manors today (Wed) through the Broward Art Guild. The works will be up for 4 to 6 weeks and available for purchase. Feels soooooo good to have my first solo public showing!

Here's a peek at a few of the pieces I will have in the show:

 In my kitchen putting on the finishing touches.

 Elements (these colors look Amazing in person!)

 Oceans - just reminded me of being on the water in St Thomas, USVI

 Stormy Fields - this reminds me of an impending storm.

Moon Fields - Samantha thought it looked like being on the moon in this painting.

And, one of my favorites: Lavender Fields. :)

I'll post details re a date / time for a reception so you can come take a look at my work at Java Boys! Look forward to seeing you all.

Tristina